
")
This article will look at how to force update software made available (not required) through the Company Portal.
Two deployment methods (Required and Available) are possible for deploying a Win32 app to endpoints through Microsoft Endpoint Manager (Intune).
Required apps are installed automatically on enrolled devices; the user can't stop the installation. This can be deployed to devices or user groups.
Available apps for enrolled devices are displayed in the Company Portal for users to install optionally. Available assignments are only valid for user groups, not device groups.
Suppose users install software made available (not required) in the Company Portal. In that case, it's unfortunately not possible to update the software (out-of-the-box) from the Endpoint Manager portal if a new version is released. This is because (as mentioned above) apps made available for users are optional, and we can't force installation with that option.
So how do we force software updates to user endpoints, even if installed through the “available” option?
We can use a technique that utilizes the "Win32 Apps Requirements" feature and a custom PowerShell script in the app management section.
The underestimated Win32 app requirements feature
When deploying a Win32 app through Microsoft Endpoint Manager (Intune), it's possible to set specific requirements that the device needs to fulfill before the software can be installed.
Two mandatory built-in requirements must be set while deploying a Win32 app:
- Operating system architecture: Architecture needed to install the app, such as 32 or 64-bit
- Minimum operating system: Operating system level such as Windows 10 build 1607 (or higher)
Other built-in requirements are optional (I will not get more in-depth with these):
- Disk space required
- Physical memory required
- Minimum number of logical processors required
- Minimum CPU speed required (MHz)
Besides the above built-in requirements, we can set our additional requirements through three methods:
- File: Verifies requirements rules based on file or folder existence, date, version, or size.
- Registry: Validate the requirements based on registry settings such as key existence, string comparison, or version.
- Script: Assesses requirements through PowerShell that cannot be covered using file or registry methods.
As I mentioned in the introduction, the technique to update software only made available uses the script requirement method. When using the script method, the Intune Management Extension on the devices evaluates the output returned from the script if the requirement is fulfilled or not. Depending on the returned value, the software will be enabled to install either through the “Required” or the “Available” deployment method.
The solution
So now, you may consider leveraging the requirement mentioned earlier to mitigate updating old software versions. Let us take a closer look at how.
The solution is to create and deploy an additional Win32 app in Endpoint Manager (Intune). The software version of the additional app should be the same or higher as the existing/original app already deployed to devices/users. This app must be deployed to the “All Users” group using the “Required” deployment method.
But wouldn't that force us to install the additional Win32 app on all devices?
Yes, but the additional Win32 app will have a “special” PowerShell script that searches the client for previous software versions. Suppose the search finds an earlier version of the software. In that case, it tells Intune Management Extension that the additional app can proceed with the force install; otherwise, the update will not be available for installation on that device.
Please look at the following flowchart for those needing a visual approach to the process.

If we look at the diagram, the flowchart process on top is usually the standard way of deploying a Win32 app through Endpoint Manager.
- The administrator uploads a new Win32 app package (.intunewin format), a detection method through script/registry/file, and deployment assignment to a group with the “Available” deployment method.
- The end-user finds the newly added Win32 app in the Company Portal and tries to install it.
- The Intune Management Extension will check (with the detection script) if the specified software is already on the device; if not, it will proceed with the installation.
- (when a new version from the software publisher is released, the administrator will reinitiate step 1)
The issue here is, that if step 4 is activated, then the user's applications installed in steps 2 and 3 are not automatically updated.
So we need a side-by-side Win32 app that will be "hidden" in the Company Portal and do frequent searches after older installed versions through a “requirement” script.
The flowchart placed at the bottom illustrates this process.
- The administrator uploads a new Win32 app package (.intunewin format), a detection method through script/registry/file, and a Required deployment assignment to the "All Users" group (this is important). A “requirement” PowerShell script is added, which searches for older software versions.
- Now all devices will check the requirement(s) for the Win32 app automatically. If the condition (s) is met (meaning it found an old version), it will proceed with the installation (update) of the software. Otherwise, if there are no old versions, it will abort the installation and retry within 24 hours.
- Next, the Intune Management Extension will check (with the detection script) if the specified software is already on the device; if not, it will proceed with the installation.
- (when a new version from the software publisher is released, the administrator will reinitiate step 1)
So now we have an overview of how we can update Win32 apps offered through the Available method. Let's take a closer look at the “requirement” script.
A closer look at the requirement script
The “requirement” script is not magic; the purpose is to find versions of specific software. If it finds an old version, it will need to return some output for the Intune Management Extension to figure out if the requirement is fulfilled or not.
“For a rule based on a PowerShell script requirement, if the existing code is 0, we'll detect the standard output (STDOUT) in more detail. For example, we can detect STDOUT as an integer that has a value of 1.” -quote from Microsoft
Ref.: https://docs.microsoft.com/en-us/mem/intune/apps/apps-win32-add#step-3-requirements
The above statement means that if the script finds a previous version, it should output a string with the exit code 0. Here is an example script:
|
1 2 |
Write-Host "Upgrade"; Exit 0; |
Then, in Endpoint Manager, we tell the application to look for a string with the value “Upgrade”. If it finds the string, the requirement is fulfilled, and the Win32 app can proceed to install.
Here are some combinations of the detection:
| Exit code | Text Returned | State |
|---|---|---|
| 0 | Not detected | |
| 0 | Upgrade | Detected |
| (anything else than 0) | Not detected | |
| (anything else than 0) | Upgrade | Not detected |
Creating a script for each application can be time-consuming, and the technique is almost the same per app, with some exceptions.
I have created a generic script for this purpose; look at our GitHub repository for the PowerShell script.
To use the PowerShell script, you must adjust three variables (lines 27, 30, and 33).
- $Name - Name of the software. An example could be "Notepad++". Try to match the name as you see in the Add/Remove programs in the control panel/settings of the device.
- $Version - Version of the latest version or baseline in your environment. An example could be “8.4.2”. Only use numbers and punctuation.
- $Method - There are two options here, "Detection" or "Requirement". For this process, use the ladder.
If the script finds a previous version of “Notepad++”, it will return the string “Upgrade”.
So enough theory, let's go through an example of how we can combine the bits and pieces in the guide below.
Step-by-step guide on how to create an update Win32 app
Let's go through each step to create a Win32 app that will update previous software versions on endpoints. In this example, we are going to use the 7-zip software. We assume you already have a Win32 app made available (deployment method) in Endpoint Manager for 7-zip version 19.00, and you need to upgrade to the latest version, 22.01.
Before you start following this guide, test it in a non-production environment and please ensure that the following prerequisites:
- A working Microsoft 365 tenant
- At least one Microsoft 365 license with the Endpoint Manager (Intune) feature included
- Permission to administer the Endpoint Manager (Intune) tenant such as "Intune Service Administrator" or "Global Administrator"
- A working internet connection (obvious, right?) that can access “https://endpoint.microsoft.com”
- Basic knowledge of Intune / Endpoint Manager
Create an IntuneWin package
Let's start with converting the new version of 7-Zip into the Win32 app format (.intunewin).
- Download the latest version of the 7-Zip software (time of writing 22.01) installation file and save it somewhere you remember; I will use “C:\Package\7zip” as the folder for future reference.
- Download the latest version of the Microsoft Win32 Content Prep Tool to your local PC, and place the executable here “C:\Package\IntuneWinAppUtil.exe” for future reference.
- Open a terminal (I will use CMD) and execute the following command:
C:\Packages\IntuneWinAppUtil.exe -c "C:\Packages\7-Zip" -s "7z2201-x64.exe" -o "C:\Packages\7-Zip" -q
This will create the following IntuneWin file “C:\Packages\7-Zip\7z2201-x64.intunewin”. - We have now created an IntuneWin file for the latest 7-Zip version.
Next, we will prepare the detection and requirement script for the two Win32 apps we need to create in Endpoint Manager.
Preparing the detection and requirement script
We will now prepare the two scripts (requirement and detection) to create the Win32 apps in Endpoint Manager. But, first, I will use this script (as mentioned earlier in the article) as a baseline.
- Download the script and save two copies of it here (or somewhere you remember): “C:\Packages\Detection.ps1” and “C:\Packages\Requirement.ps1”.
- Open the file “C:\Packages\Detection.ps1” with the editor of choice.
- Change line 27 to:
$Name = '7-Zip'; - Then on line 30, change it to:
$Version = '22.01'; - And finally, line 33 change it to:
$Method = 'Detection'; - Save the detection PowerShell script.
- Now open the file “C:\Packages\Requirement.ps1” with the editor of choice.
- Change line 27 to:
$Name = '7-Zip'; - Then on line 30, change it to:
$Version = '22.01'; - And finally, line 33 change it to:
$Method = 'Requirement';
With the two PowerShell scripts ready, we will focus on creating the Win32 apps in Endpoint Manager.
Update the existing 7-Zip Win32app made available to users in Endpoint Manager
In this section, I will assume that you already have an old copy (older than version 22.01) of 7-Zip in your Endpoint Manager environment.
-
Open a browser and navigate to the Endpoint Manager portal in Microsoft 365.
-
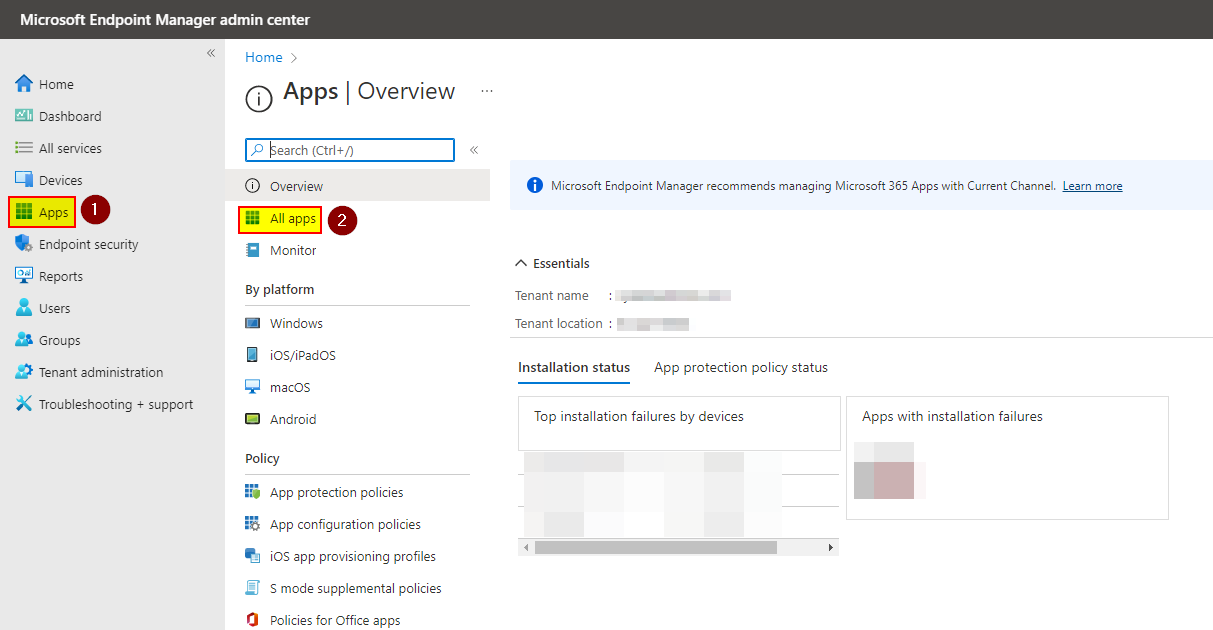
Now click on “Apps” in the left menu and then “All Apps”.
-
Find the old 7-Zip Win32 app and click on it.

-
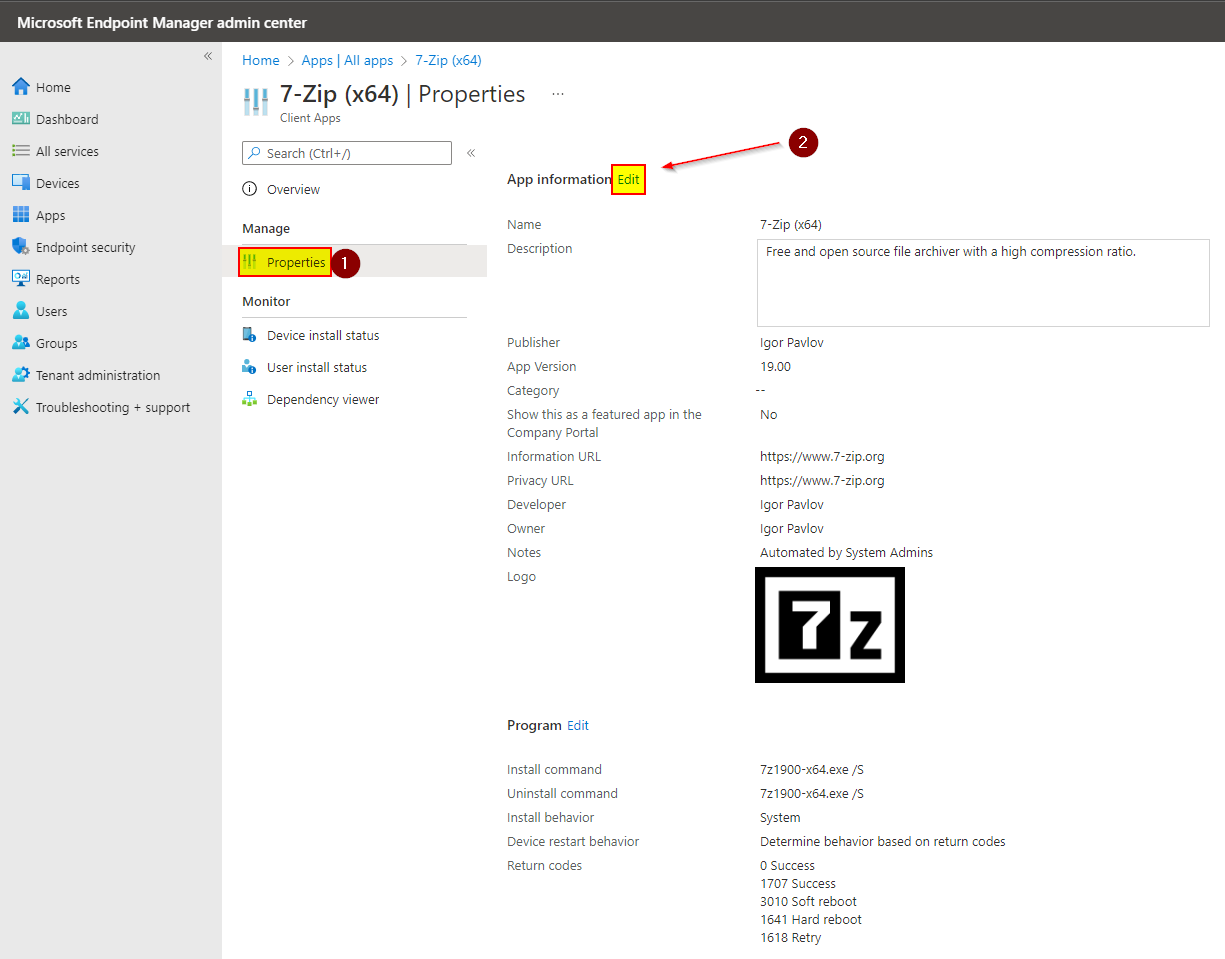
Click on “Properties” and then “Edit” next to “App Information”.
-
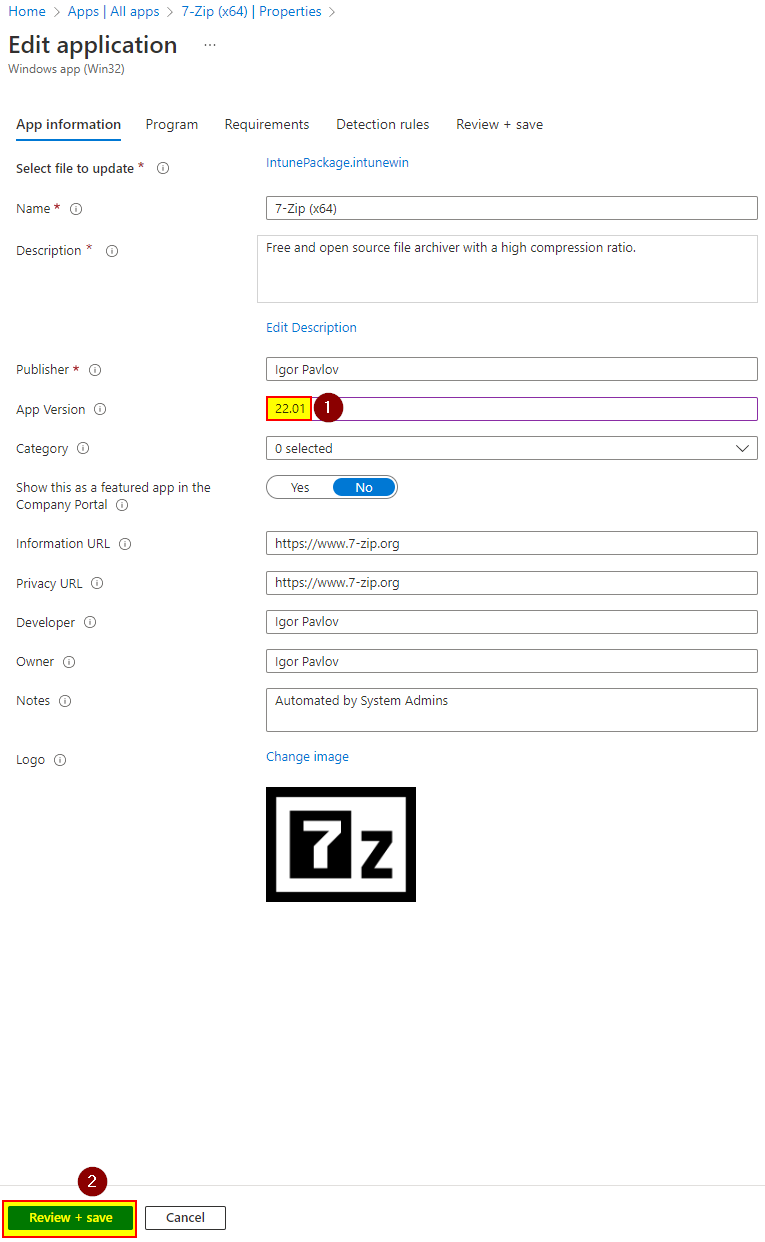
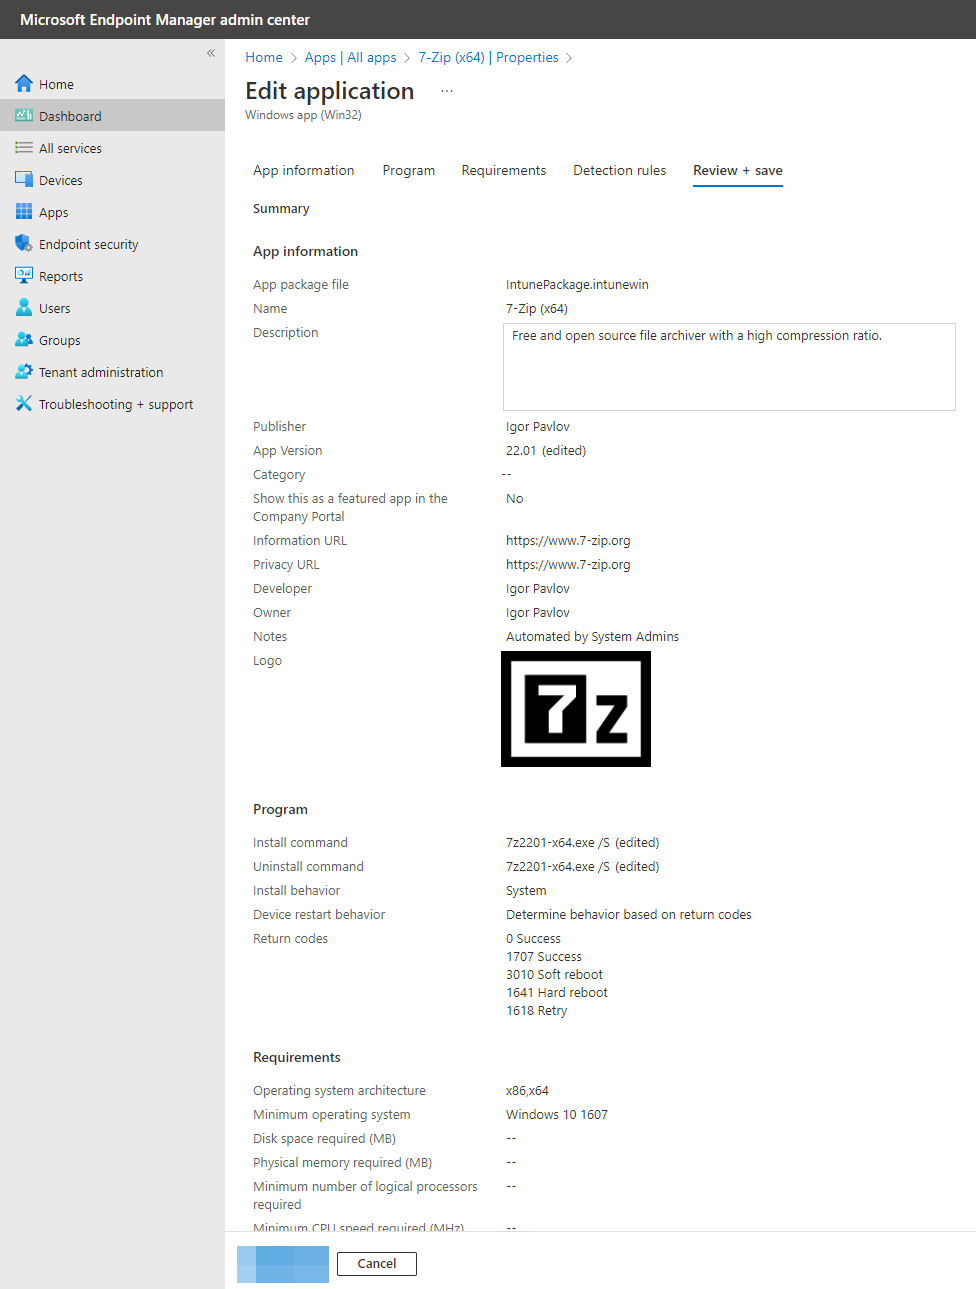
Change the app version accordingly, then click “Review + save”.
-
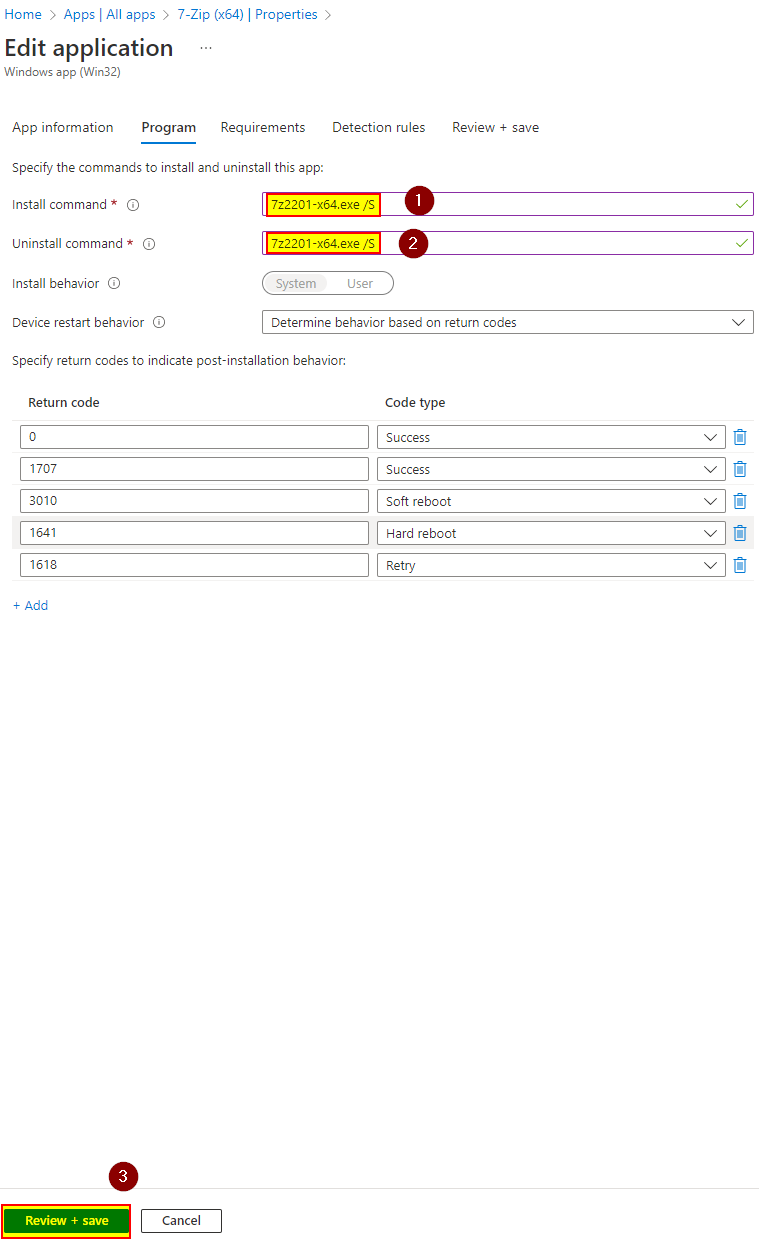
Now change the install (and uninstall) commands to the new installation executable filename you packaged in the IntuneWin file. In my case, it would be “7z2201-x64.exe /S” for both. Click “Review + save” again.
-
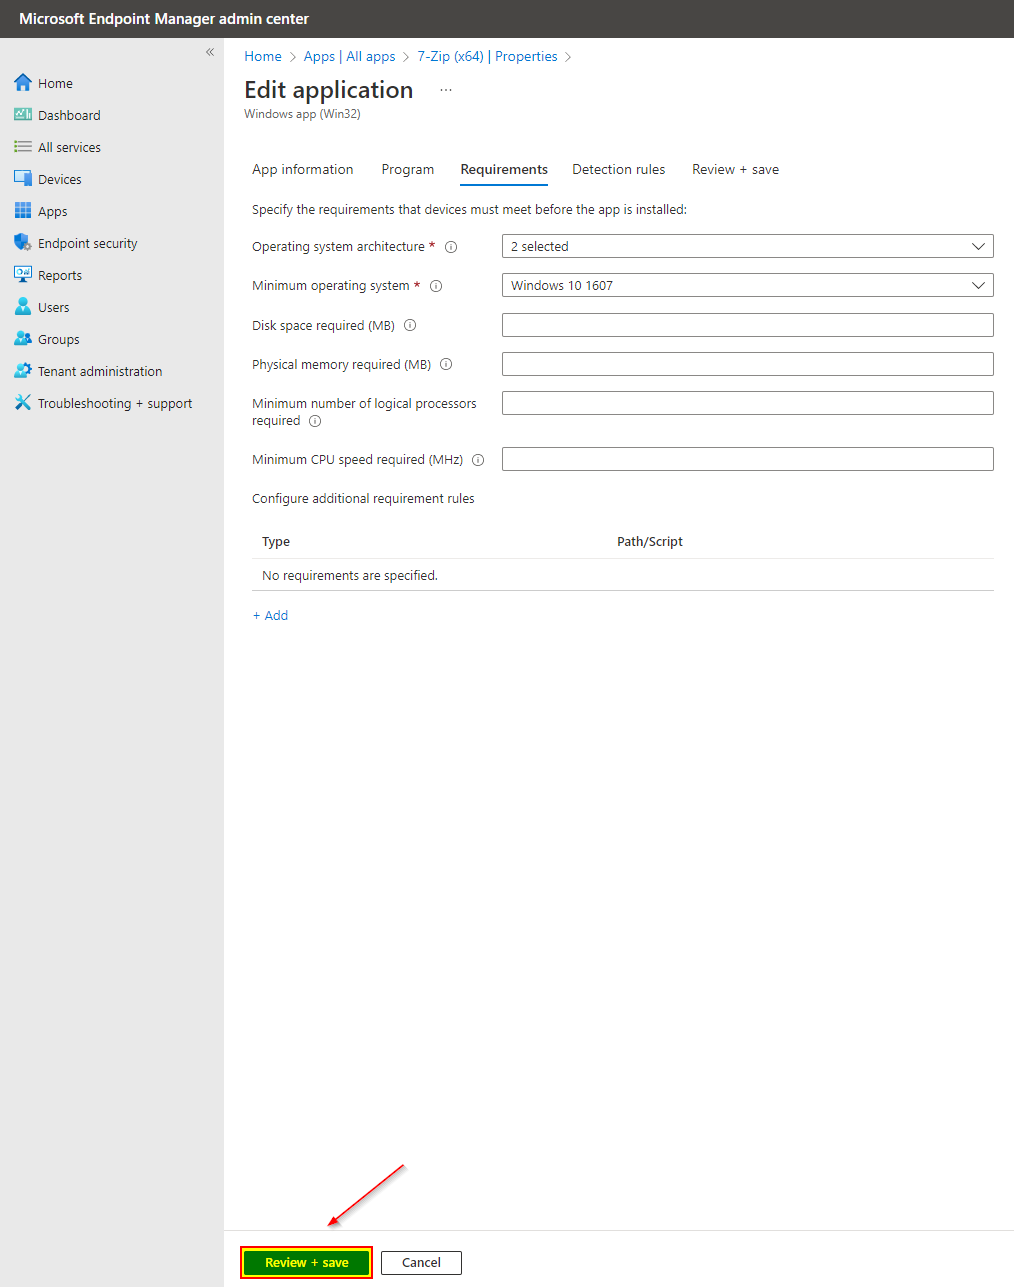
Skip the “Requirement” blade, and click again on “Review + save”.
-
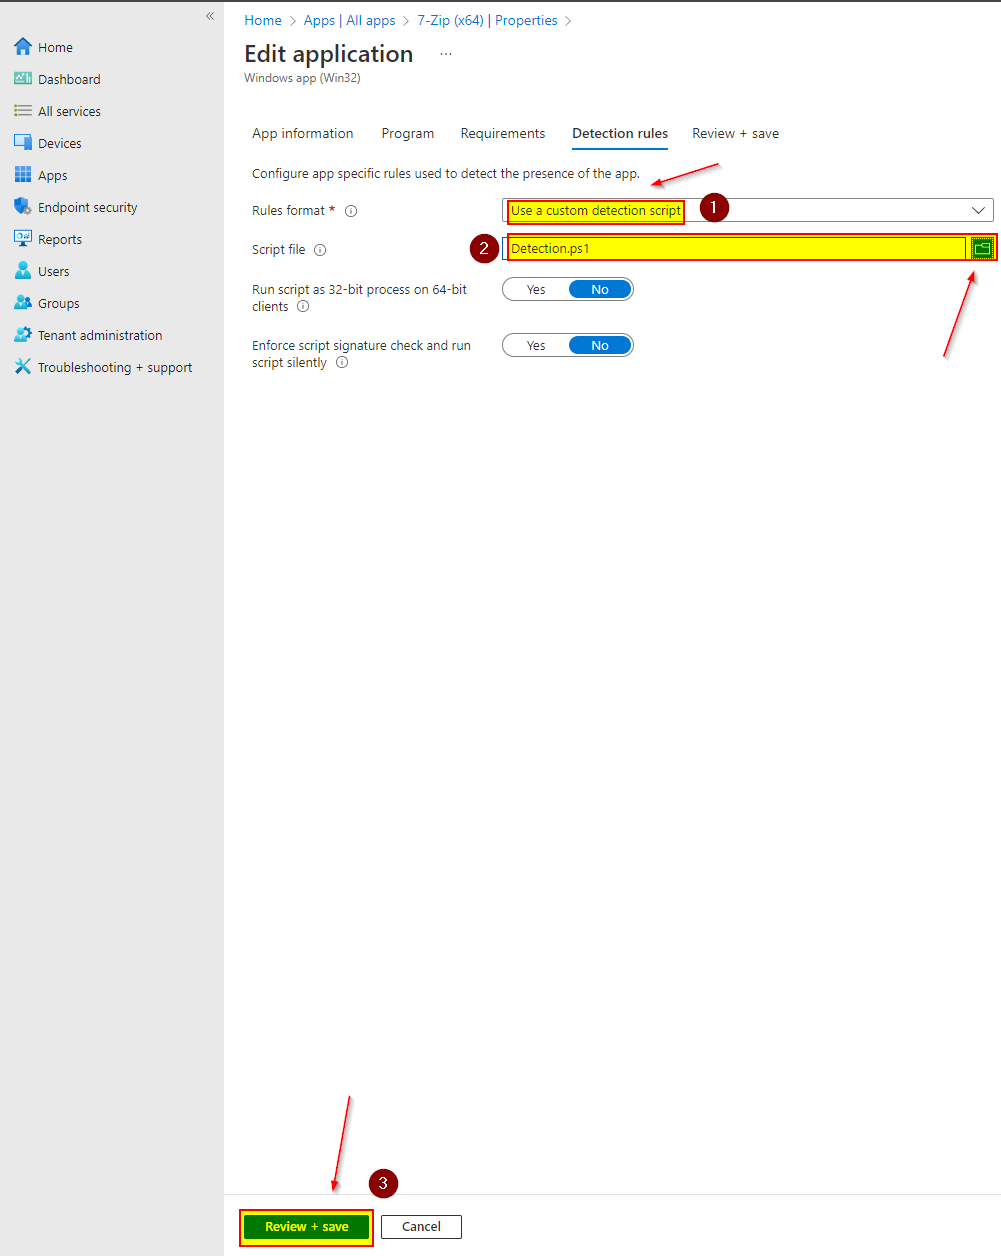
Now on the detection blade, choose “Use a custom detection script” in the rules format dropdown. From the script file textbox, upload the file “C:\Packages\Detection.ps1” we created in the previous section, then click “Review + save”.
-
Now click on “Save”.
-
I assume users already have an assignment through the Available deployment method.
Now we have updated our app that users see in the Company Portal; next, we will create the Win32 app that will force all upgrades of an earlier version than 22.01 of 7-Zip.
Creating the Win32 app, which will update the software made available
This section has more or less the instructions shown above; we will create a new app with the exact details as before; the only difference is we will add a requirement script and deploy it as required to "All Users".
-
Open a browser and navigate to the Endpoint Manager portal in Microsoft 365.
-
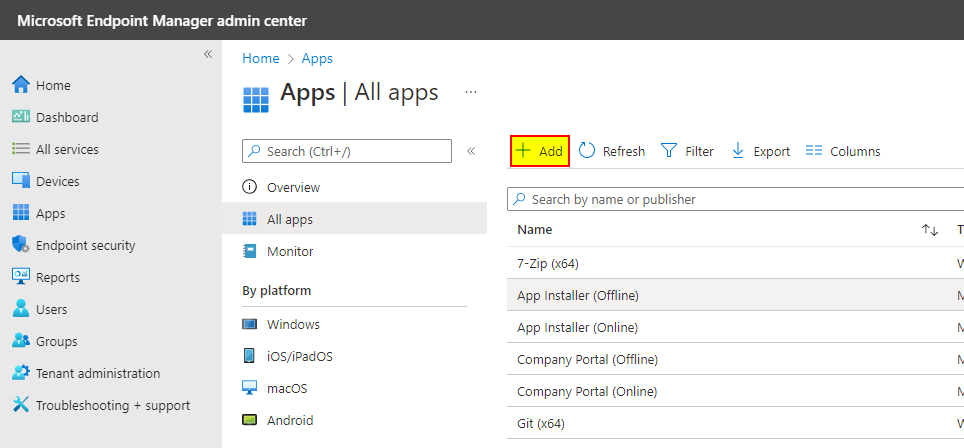
Now click on “Apps” in the left menu and then “All Apps”.
-
Click on “Add”.
-
Select “Windows app (Win32)" under the category “Other”, and click on “Select”.

-
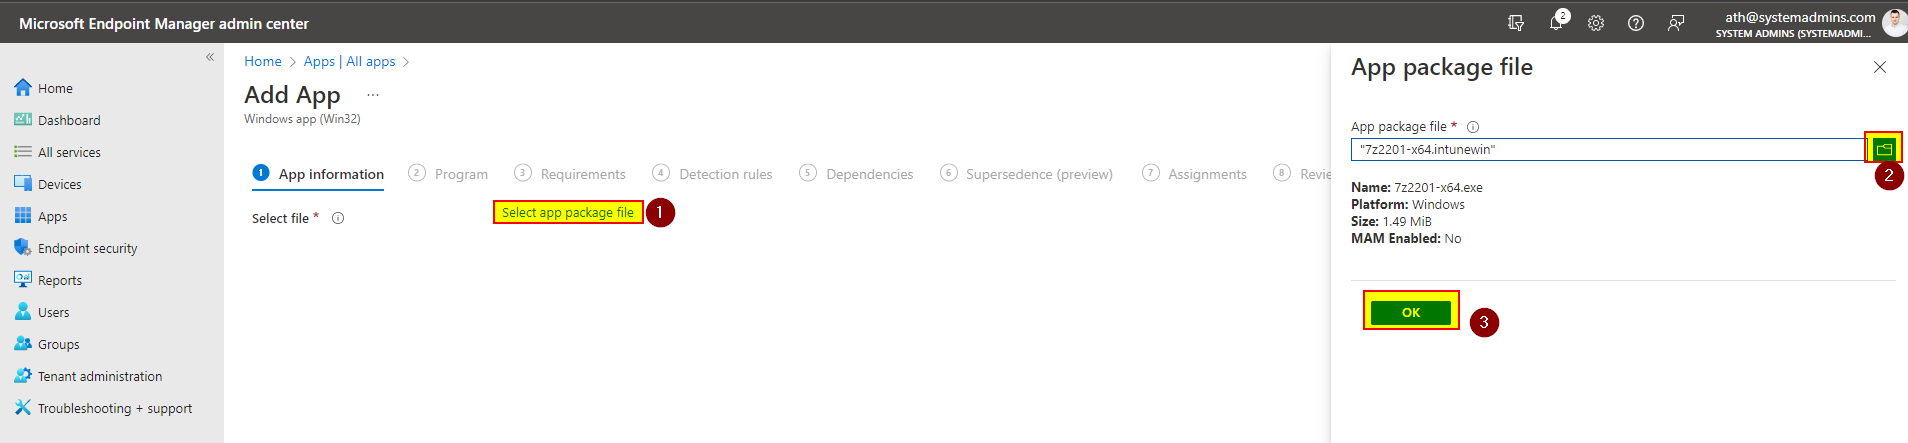
Click on “Select app package file”, click on the folder icon and browse to the IntuneWin file we created earlier, “C:\Packages\7-Zip\7z2201-x64.intunewin”. Click “OK”.
-
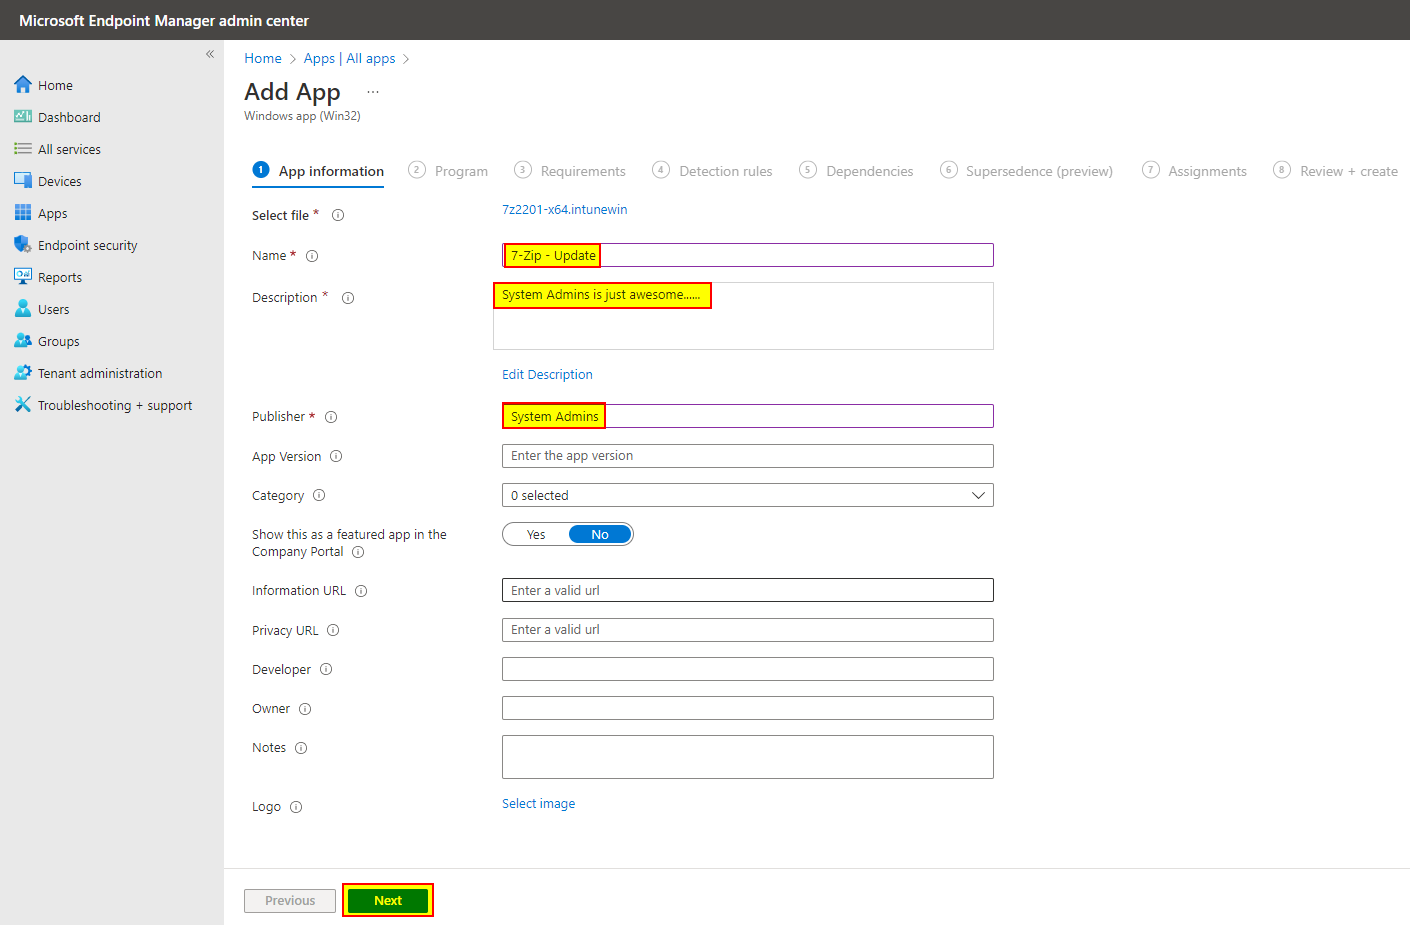
Now fill out the required fields (Name, Description, and Publisher) and click "Next". I usually fill out all the fields for a better user and administrator experience.
-
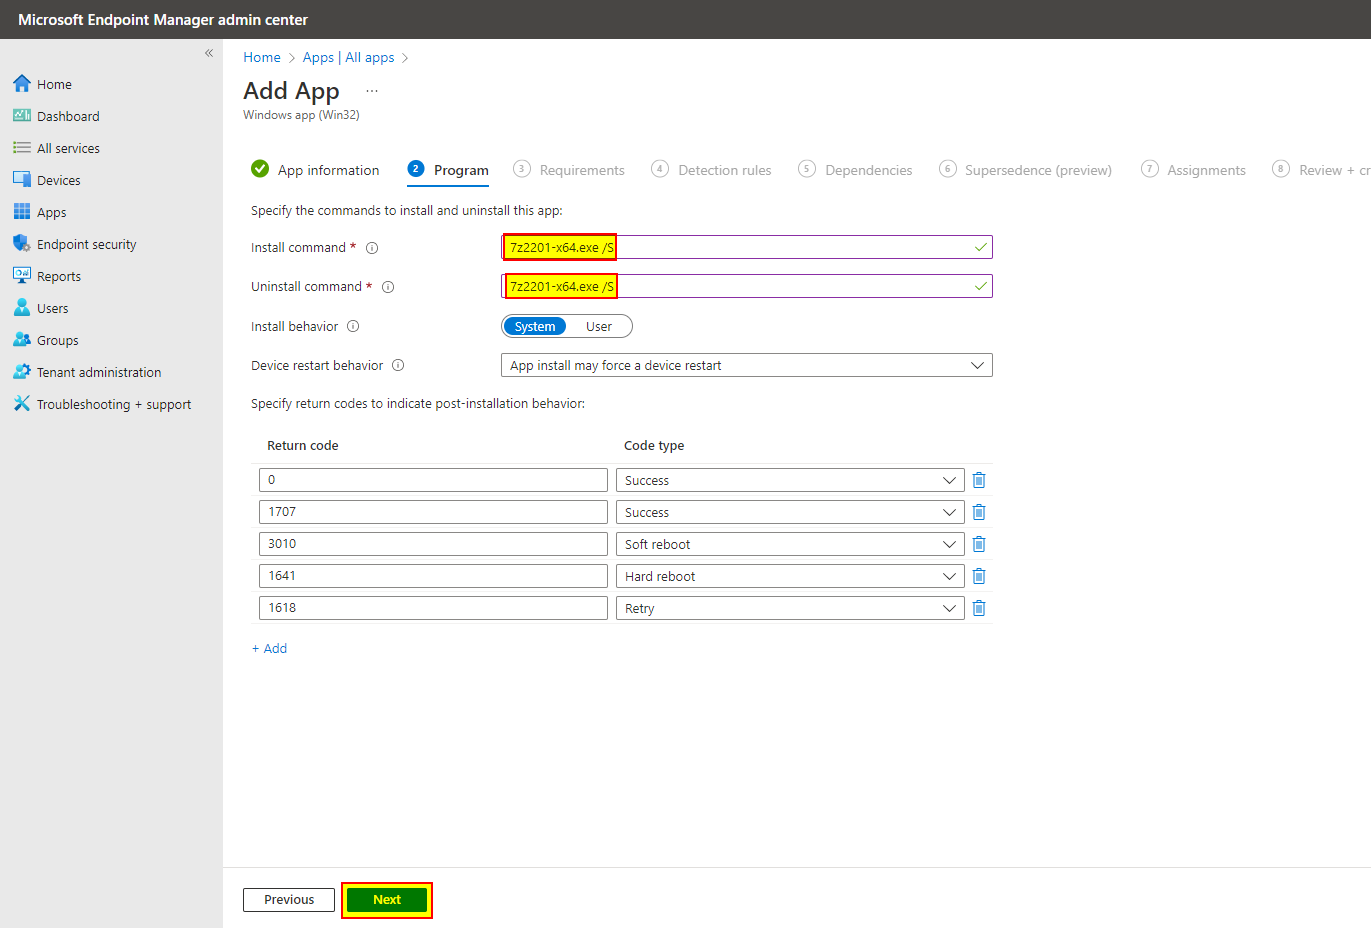
In the install/uninstall command to the installation executable filename, you packaged it in the IntuneWin file. In my case, it would be “7z2201-x64.exe /S” for both. Leave the other default values and click “Next”.
-
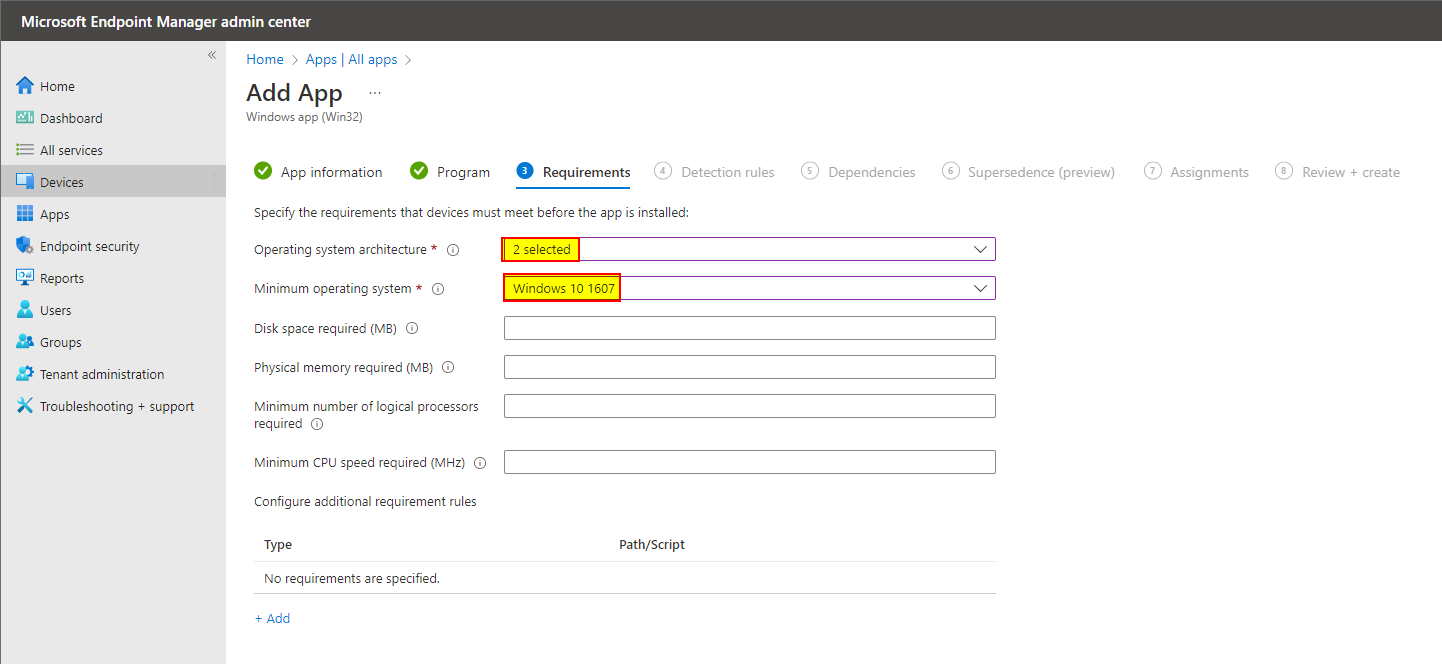
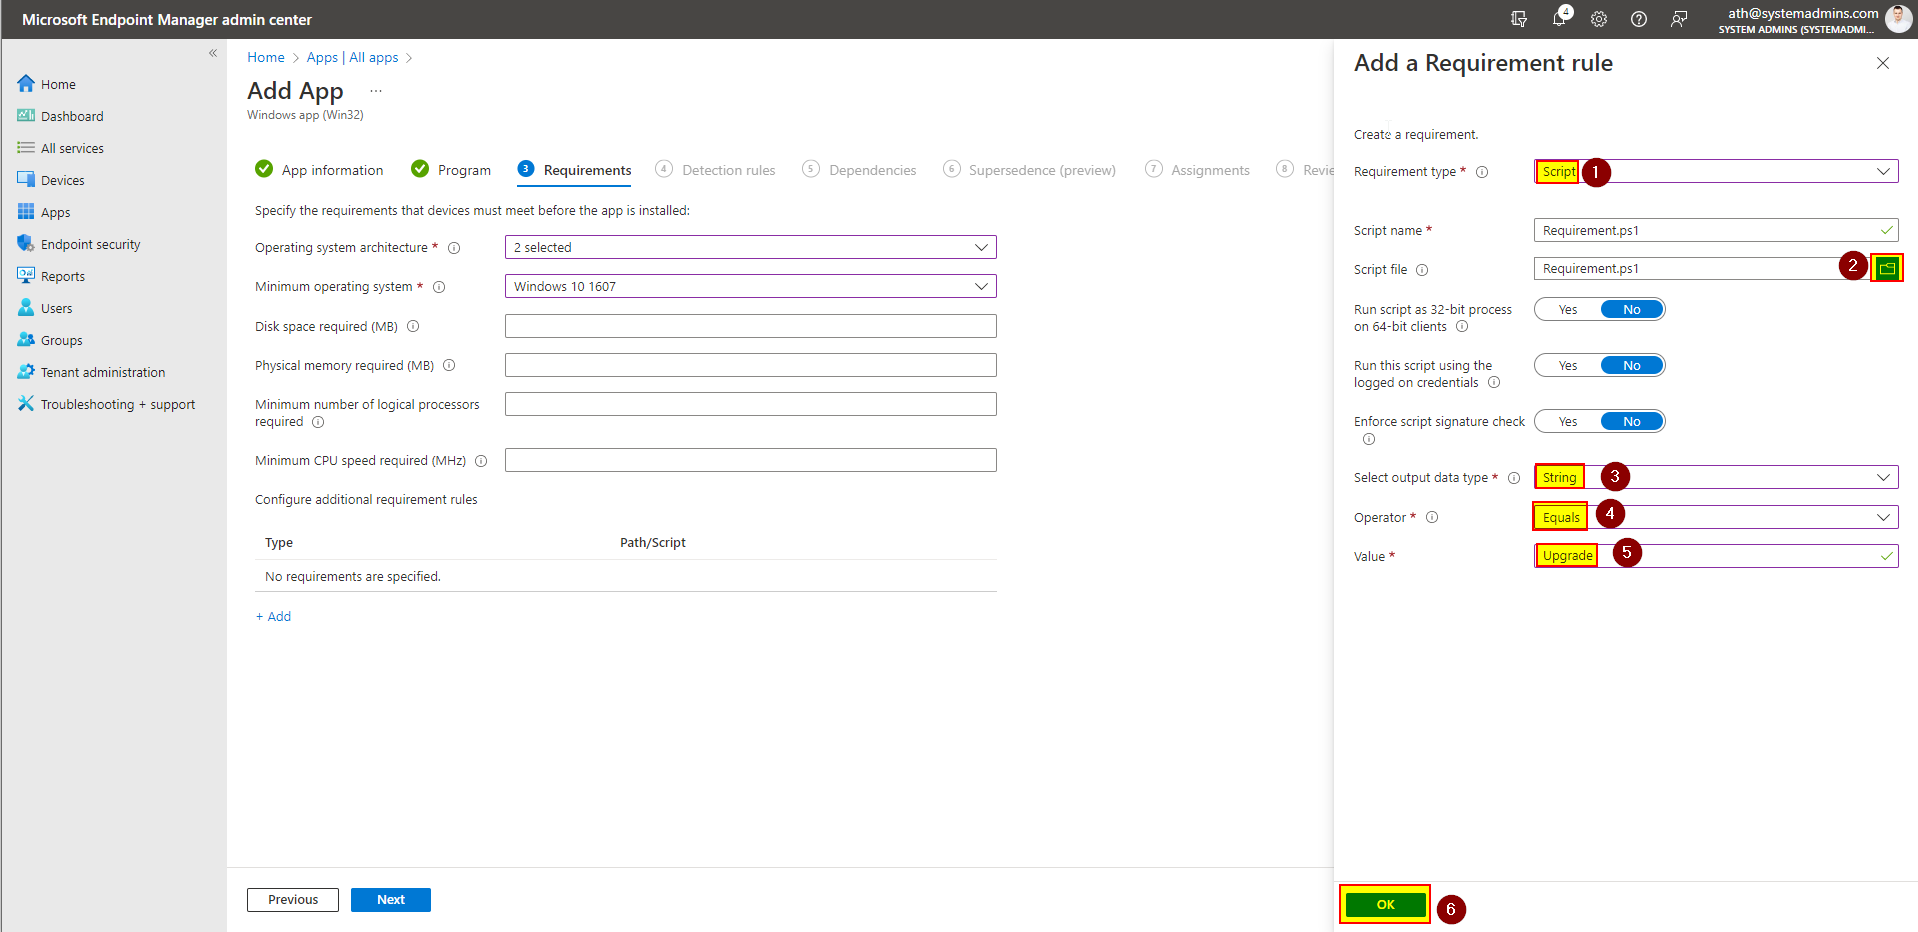
On the requirements blade, select “32-bit” and “64-bit” on the “Operating system architecture” dropdown. In the “Minimum operating system” choose “Windows 10 1607”.
-
Under “Configure additional requirement rules” click on “Add”. Choose “Script” in “Requirement type”. Browse to the requirement script by clicking on the folder icon, and then choosing the file “C:\Packages\Requirement.ps1”. In the “Select output data type” choose “String", “Operator” should be “Equals” and “Value” needs to be “Upgrade”. Finally, click “OK” and “Next” on the requirement blade.
-
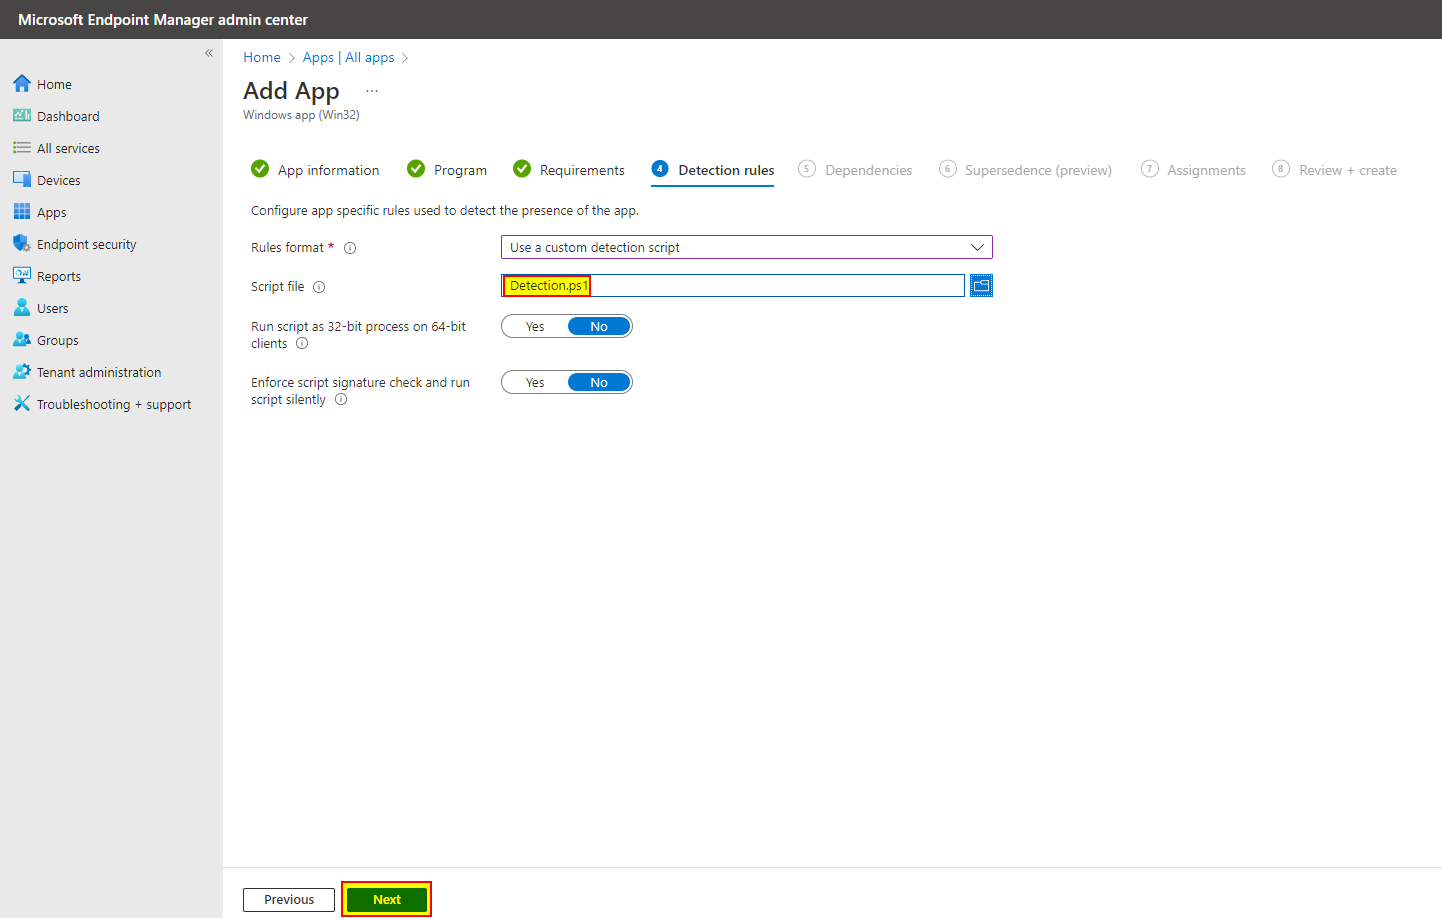
Now on the detection blade, choose “Use a custom detection script” in the rules format dropdown. From the script file textbox, upload the file “C:\Packages\Detection.ps1” we created in the previous section, then click “Next”.
-
Skip the “Dependencies” and “Supersedence” blades by clicking “Next” two times.
-
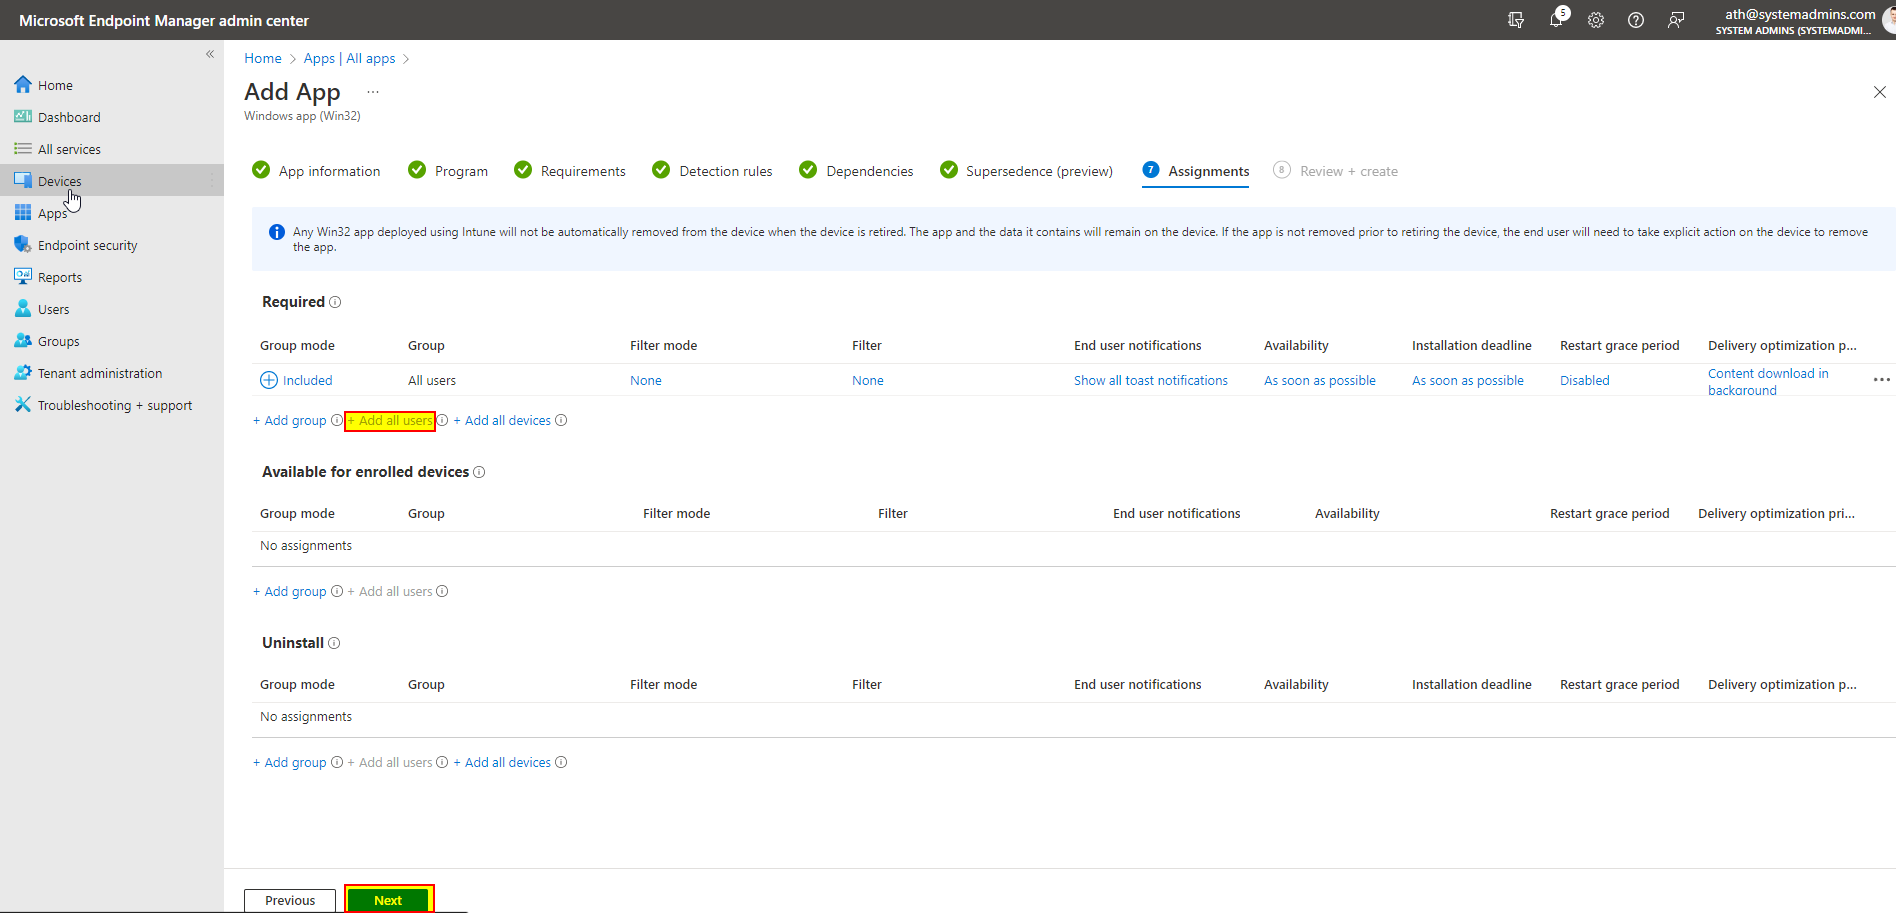
On the “Assignments” blade, click on “Add all users” under the Required section. Then click “Next”.
-
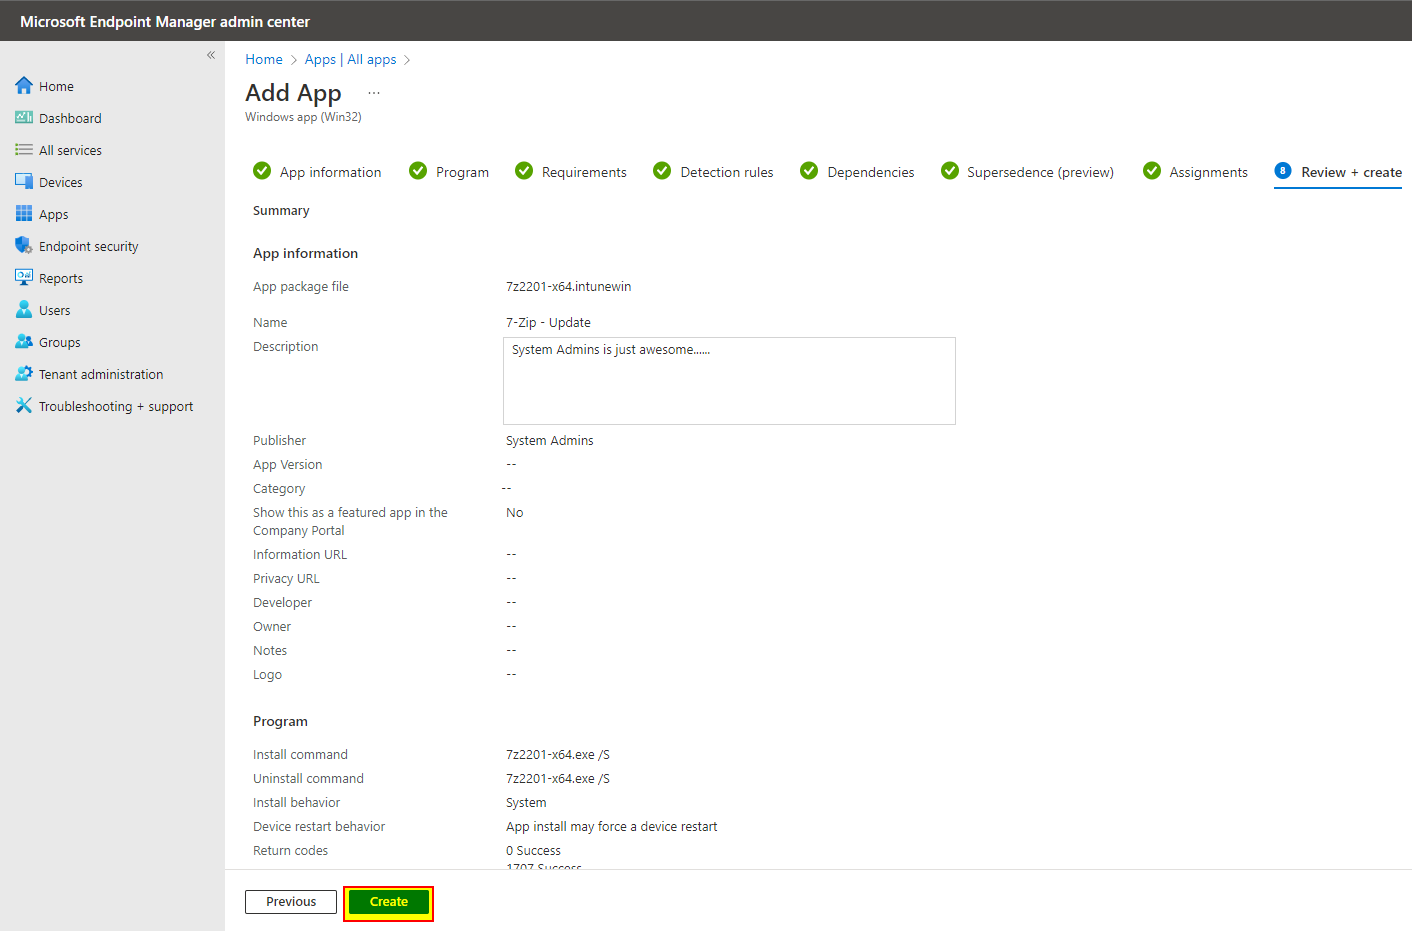
Finally, click on “Create”.
That's it! As soon as the endpoints pick up the change, they will start to update the 7-zip installation automatically for all devices with an old version.
Closing statement
I wish Microsoft had some built-in mechanisms to automatically update apps on endpoints if the version is changed within the Endpoint Manager portal. But this is not the case, but soon Winget will be integrated (late 2022) into Endpoint Manager, and hopefully, this will change with this feature. For more information about this, see the following article.
The above solution can be time-consuming for every update a publisher releases; therefore, I have created a set of automation scripts that automatically download, package and upload to Endpoint Manager leveraging the Winget repository. For more information, follow this link.
As always, please leave comments below if something is unclear!
Abbreviations
| Abbreviation | Meaning |
|---|---|
| Win32 | 32-bit Windows Application Programmable Interface (API) |
| App | Application |
| MEM | Microsoft Endpoint Manager |
| STDOUT | Standard output |
Comments